Inspired by the yummy orange and almond cake that I had at the Holburne Museum Garden Cafe last week, I thought I’d attempt to bake an orange and almond cake myself.
And guess what? …
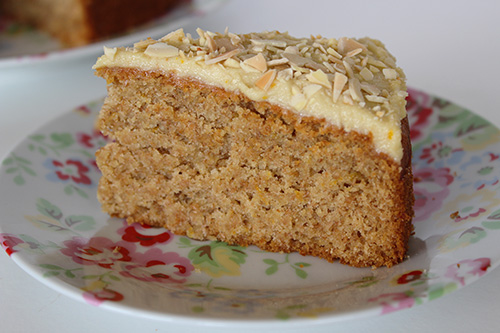
It wasn’t a flop!
Look, it’s even cake shape (unlike last week’s brownie gloop which I had to turn into a chocolate ‘pudding’).
 | Bit of the Good Stuff")
This cake is beautifully moist and has the most delicious almond flavour with a hint of orange.
AND, it’s got lots of lovely goodness in it, including B vitamins, vitamin C, vitamin E and a few minerals to boot. The cake’s also low GI, so it gives us slow release energy rather than those horrible refined sugar energy spikes.
AND it’s easy to make. Even for me! (and if I can bake it, you definitely will be able to!)
One of my study group friends said it’s the best cake I’ve ever made. (To be fair, I haven’t set the bar very high with my attempts at baking, but it’s wonderful to hear that I’ve actually made something that’s more than edible).
M and Lil’ L absolutely loved it. In fact, Lil’ L said it was one of the best cakes in the world! For this reason alone, I think this cake deserves its own blog post. So here it is.
[print_this]
Unlike regular cakes which are full of ’empty’ calories, this cake is packed full of vitamins, minerals, antioxidants, protein and fibre. It also provides slow release energy thanks to the wholegrain flour and almonds. I would class this cake as a healthier ‘eat any time’ kind of cake, though some of my readers have served it at parties and told me that it went down a treat. It can easily be prepared in advance. In fact, we find it tastes even better a day or two after baking.
Ingredients
140g / 1 cup fine wholemeal (whole wheat pastry) flour or chapatti flour
140g / 1 cup plain (all purpose) flour
1½ tsp baking powder
½ tsp bicarbonate of soda (baking soda)
½ tsp salt
100g / 1 cup ground almonds (almond meal)
100ml / ½ cup organic rapeseed (canola) oil or other neutral-flavoured oil
150ml / ½ cup + 2 TBSP soya or almond milk
200ml / ⅔ cup maple syrup
½ TBSP zest from an unwaxed/organic orange
60ml / ¼ cup freshly squeezed orange juice
1 tsp orange extract
½ tsp almond extract
Decorating options:
Orange Cashew Cream Frosting (see below) or apricot fruit spread (e.g. St Dalfour)
3 TBSP toasted flaked almonds, crushed
Method
1 Preheat the oven to 180C (160 fan) / 350F. Grease the sides of a 20cm / 8 inch loose-bottomed cake tin with oil and line the bottom with non-stick baking paper.
2 Sift the flours, baking powder, bicarbonate of soda and salt into a large bowl. Tip any remaining wheat germ into the bowl. Add the ground almonds and stir through to combine.
3 In a separate bowl, use a fork to whisk together the oil, milk, syrup, orange zest, orange juice, orange extract and almond extract until fully combined.
4 Make a well in the dry ingredients, pour in the wet ingredients and stir to combine (but do not over mix). Pour the batter into the prepared tin.
5 Bake for 45 minutes, or until the cake is lightly browned and springs back when lightly pressed. Leave the cake to cool in its tin until completely cooled (it will firm up as it cools).
6 Decorate with frosting or apricot fruit spread and sprinkle toasted flaked almonds on top. Lightly press down on the almonds so that they stick. Chill in the refrigerator before serving.
7 Stored in an airtight container in the refrigerator, this cake will keep for up to 5 days. It also freezes well.
[/print_this]
[print_this]
Orange Cashew Cream Frosting
Yield: about 240g / ¾ cup
Hand on time: 10 minutes Ready in: 70 minutes
Ingredients
110g / ¾ cup raw cashews
55 ml / 3 TBSP maple syrup
½ TBSP zest from an unwaxed/organic orange
30ml/ 2 TBSP freshly squeezed orange juice
1 tsp orange extract
½ tsp vanilla extract
45g / 3 TBSP virgin coconut oil, melted
Method
1 To soften the cashews, boil them in a pan of water for 15 minutes or soak in freshly boiled water for 30 minutes. Rinse in cold water and thoroughly drain.
2 Place the cashews in a food processor along with the syrup, zest, orange juice, orange extract and vanilla extract. Process until the cashews are ground into a creamy mixture. Stop now and then to scrape down the bowl. Add the melted coconut oil and continue blending for a few minutes until the mixture is completely smooth. Taste test for smoothness.
3 Scoop the frosting into a bowl and chill for one hour, or until firm enough to spread. The frosting will keep for 5 days in the refrigerator. It is also freezable
[/print_this]
Have a wonderful weekend everyone!
With love,