Easy Gingerbread Blender Pancakes (Vegan)

We’re still loving our ‘special’ Sunday breakfast of freshly made pancakes. Lil’ L now helps me in the kitchen and is enjoying making the pancakes as much (well, almost as much!) as he enjoys eating them. This week, we flavoured our pancakes with the same spices as our favourite gingerbread cookies. We couldn’t wait for the taste test!

Gingerbread Pancakes (Vegan / Dairy-free / Gluten-free)

And the verdict?

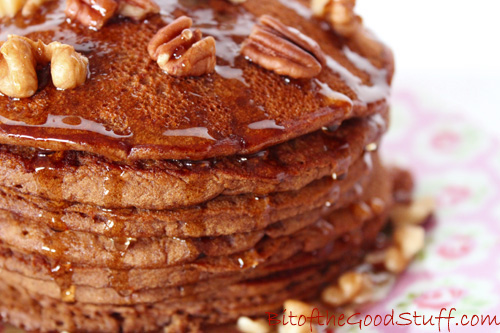
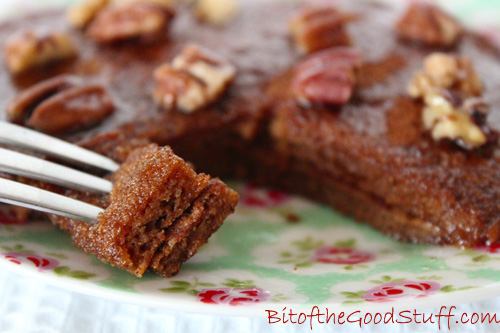
They were utterly delicious! And arguably the perfect pancake for this time of year. Spicy, warming and filling

They also happen to be filled with goodness… The Blackstrap molasses fortifies the pancakes with iron, calcium and other trace minerals, while the addition of apple adds a healthy dose of antioxidants and dietary fibre. We used a gluten-free flour mix for these pancakes to see how it would hold up (it worked perfectly!), but they could easily be made with wheat flour too.

Gingerbread Pancakes (Dairy-free / Gluten-free / Egg-free / Vegan))

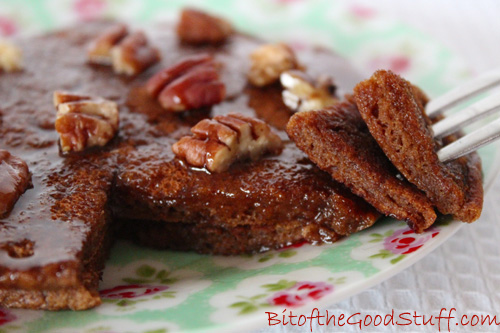
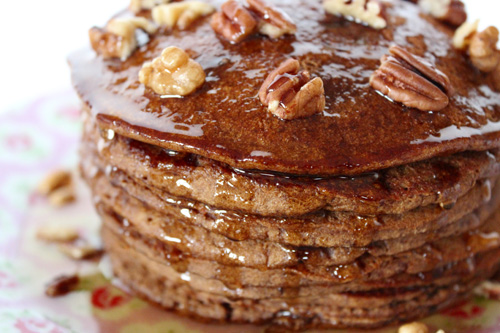
We like to top our pancakes with chopped walnuts and pecans, and a sprinkling of ground golden linseed. As well as adding a lovely texture, these toppings ramp up the nutrient factor, providing more antioxidants, protein and omega 3. And, of course, there’s the obligatory drizzle of syrup 😉

The first pancake stack was devoured within minutes so, much to Lil’ L’s delight, I made a second batch to photograph. From the look of things, these won’t be around long either 😉

Gingerbread Pancakes (Vegan / Gluten-free)


[print_this]

Serves: 2-3
Hands-on time: 20-35 minutes    Ready in: 20-35 minutes

Ingredients
1 ripe medium banana
250ml / 1 cup sweetened soya milk (see Notes)
2 TBSP Blackstrap molasses (or sub with black treacle/molasses)
70g / ½ cup wholemeal (whole wheat) flour, chapatti flour or gluten-free flour mix
35g / ⅓ cup rolled oats (quick oats not jumbo)
1½ tsp baking powder
½ tsp bicarbonate of soda (baking soda)
1 tsp ground cinnamon
1 tsp ground ginger
pinch of salt
½ TBSP organic rapeseed (canola) oil (or other neutral tasting oil), for frying

Suggested toppings
Chopped walnuts and pecans
Ground linseed (flaxseed)
Maple syrup

Method

Peel and slice a banana.

Blend the milk, molasses and banana until smooth, either using a jug blender or tall jug and hand blender. Add the flour, oats, baking powder, bicarbonate of soda, spices and salt, and blend until incorporated.

If possible, use two non-stick frying pans (skillets) to halve the cooking time. Brush the bottom of the pan with oil and heat on medium heat. To check the pan is hot enough, flick some water drops into the pan. If it sizzles, the pan’s ready.

Pour ¼ cup of batter into the pan. Once the pancake starts to firm up round the edges, carefully flip over using a slotted turner. Continue cooking for a further minute or so, until the underneath is browned. Place the pancake in a warm oven while you prepare the rest.

Any leftover pancakes can be stored in the fridge for up to three days. They make a great after-school or post-exercise snack! Gently heat through on the hob or in the microwave before serving.

Notes

* I’ve found soya milk to be the best milk for pancake making as it produces robust pancakes that are easy to flip over. You can substitute with almond milk in this recipe, but I would also highly recommend adding in 2 TBSP ground linseed (flaxseed) to help firm up the pancakes.

[/print_this]

Products used in this recipe:
Meridian Organic Blackstrap Molasses, available in health food shops and online stores
Doves Brown Bread Flour

[This recipe has been submitted to Ricki Heller’s Wellness Weekend]

Gingerbread Pancakes (Vegan / Gluten-free)

I’m sure these pancakes will make a regular appearance on Sundays now, in rotation with other favourites like Apple Cinnamon and Banana. We also love traditional crepes served with lemon and sugar. Lil’ L reckons that our ‘veganised’ version tastes as good as the crepes he eats in France. Now that’s a statement! I’ll make sure I post the recipe in time for Shrove Tuesday 😉

Do you like breakfast pancakes? If so, what’s your favourite flavour? If you’ve posted any recipes, please do share below.

Maple Pecan Granola Clusters

Today, I’d like to share one of Lil’ L’s all-time favourite breakfasts.

I started making home-made granola about five years ago in response to Lil’ L’s dislike for the dried fruits that appear in shop-bought granolas.  After a week of picking out the raisins from a granola before serving it to him, I decided that life was far too short to waste time picking out dried fruit and that I would have a try at making my own granola instead!  By making it myself, I would be able to tailor the granola to suit all our tastes.  Lil’ L loves nutty granola, I love a mix of nuts and dried fruits, while Mark will eat anything.

Maple Pecan Granola

By making our own, we could also omit the refined sugars and oils that are found in shop-bought granolas and replace them with healthy, natural alternatives.

Maple Pecan Granola Ingredients

For breakfast, we love serving this granola with non dairy milk or yoghurt.

Maple Pecan Granola

It is also delicious layered with yoghurt and berries in a parfait (we use frozen berries as they turn the yogurt a beautiful colour as they thaw!)  These can be served as breakfast, dessert or even a post-school snack.

Berry Granola Parfait

Please note that the recipe below has been updated in 2018 to bring it into line with the recipe that appears in the Bit of the Good Stuff cookbook.

[print_this]

It’s so simple to make your own granola. In fact, with very little assistance, the kids could easily make their own! Lil’ L prefers his granola to be “chunky cluster” and we’ve found a simple method of doing this which we’ve set out below.  

Makes approximately 5 cups (10 servings)
Hands on time: 10 minutes    Ready in: 60 minutes

Ingredients

300g / 3 cups rolled oats (use GF oats, if needed)

100 g / ½ cup buckwheat groats* (washed and drained)
40g / 4 TBSP fine wholemeal (whole wheat pastry) flour, chapatti flour or gluten-free flour
30g / ⅓ cup dessicated coconut

60g / ½ cup pecans, roughly chopped

30g / ¼ cup flaked almonds

30g / 3 TBSP coconut sugar or unrefined caster sugar

½-1 tsp ground cinnamon

pinch of ground nutmeg

¼ tsp sea salt

150ml / ½ cup maple syrup (or other natural liquid sweetener. I use Clarks Original Maple Syrup which is a carob and maple blend)

3 TBSP virgin coconut oil, melted

*I add buckwheat to my granolas as it’s a great source of protein and adds another dimension of texture. In the UK, it’s available in the wholefoods section of Tesco and from health food stores.  If you can’t get hold of buckwheat, you can substitute with another ½ cup of oats or other grain.

 Method

1.  Preheat the oven to 150C (130C fan) / 300F. Line a large baking tray (38 x 26cm / 15 x 10 inches) with non-stick baking paper. If your coconut oil is solid, place it in a heat-proof howl in the oven for a couple of minutes to melt it (be careful when you remove it as the container will be very hot!)

2.  In a large bowl, mix together the oats, buckwheat, dessicated coconut, nuts, sugar, cinnamon, nutmeg and salt. Stir in the maple syrup. Pour in the coconut oil and stir until the grains are thoroughly coated.

3.  Spread the granola out evenly on the prepared baking tray and press down hard so that the mixture sticks together as if you were making a thin granola bar. Bake for 40 minutes, until the granola has lightly browned. Remove from the oven and allow to completely cool (it will firm up as it cools).

4. Break up the granola into clusters. (Don’t worry if the pieces from the centre of the tray feel a little soft as I find they firm up over time). Stored in an airtight container in a cool place, the granola will keep for weeks.

5.This granola is delicious served with non-dairy milk or yoghurt, and a sprinkling of your favourite dried fruits, nuts and seeds. I often add a sprinkling of chopped walnuts and ground linseed for an omega-3 boost and goji berries for vitamin C.

[/print_this]

Pin for later ⬇️

Last Christmas, I thought I’d treat Lil’ L to some “luxury” shop-bought granola.  I bought two different brands for him, both of which included a selection of his favourite nuts and no dried fruits.  It turns out he didn’t like either of them as they were “way too sugary”!  Instead, he asked whether he could have some of our home-made granola.  Since we’d run out, he was even prepared to postpone his Christmas Day breakfast for 45 minutes until a fresh batch was baked!  I wasn’t expecting to be making granola on Christmas morning but I was happy to oblige. Thank goodness it only takes a few minutes to prepare!  We won’t be buying shop-bought granolas any more.  Home made is best by a long shot!

And if you like chocolate, how about trying our chocolate clusters? Totally scrumptious and perfect for breakfasts, snacks and desserts 🙂

Have a great weekend everyone xx

Do you make your own granolas?  If so, what is your favourite flavour combination? If you have any published recipes, please do link up below. 

Vegan Hot Cross Buns (Dairy free, Egg free)

With Easter fast approaching, we have officially entered hot cross bun season.  I adore these sweet, fruity, spiced buns.  How about you?  Are you a fan?

While the supermarket shelves are laden with hot cross buns this time of year, I prefer to bake my own.  That way, I get to make them dairy free, cut back on the sugar and fat content, and pack them with fruits and spice. 🙂

Hot Cross Buns (Vegan / Dairy Free / Egg Free)

Baking your own hot cross buns is not as difficult as you may think.  While it seems like a long process, it only takes around 30 minutes hands on time.  For the majority of the time the dough is resting!

As an added bonus, if you make your own, you will be rewarded with the most amazing scent of freshly baked buns with hints of fruit and cinnamon spice wafting through the house.  Believe me, it is so good!

Hot Cross Buns Collage (Vegan / Dairy Free / Egg Free)

While hot cross buns are normally made with strong bread flour, I prefer to use plain (all purpose), which gives a more tender texture.

Here’s how I make the Hot Cross Buns…

[print_this]

Hands on time: 30 minutes    Resting time: 1¾ hours
Cooking time: 20 minutes

Makes 15 medium or 12 large buns

Ingredients

Dough
250ml / 9 oz / 1 cup soya milk (or other non dairy milk)
1 tsp fast action / easy bake yeast
2 tbsp sugar
2 tbsp neutral flavoured vegetable oil, such as rapeseed (canola)
500g / 17½ oz / 3½ cups plain (all purpose) flour
1 tsp salt
4 tsp mixed spice
100g / 3½ oz / ½ packed cup sultanas or raisins
100g / 3½ oz / ½ cup Italian mixed peel
Finely grated zest of 1 organic/unwaxed orange
85ml / 3 fl oz / ¼ cup freshly squeezed orange juice (or other fruit juice)

Crosses
3 tbsp plain (all purpose) flour
2 tbsp water

Glaze
2 tbsp sugar
2 tbsp freshly squeezed orange juice (or other fruit juice)

Method

  1. Gently heat the milk until it is lukewarm.  Remove from the heat and whisk in the yeast and sugar.  After a couple of minutes the yeast will start to froth.
  2. In a large bowl, mix together the flour, salt, spices.  Stir in the sultanas, citrus peel and orange zest.  Make a well in the centre of the dry ingredients and stir in the oil, yeast milk mixture, and orange juice.  Bring together the ingredients using your hands.  The dough should be soft and sticky.  Depending on the type of flour used, you may need to add a little more liquid.
  3. Turn out the dough onto a lightly floured surface and knead for 5 minutes or so, until the dough is smooth.  Place the dough in an oiled bowl, cover with a damp tea towel or oiled cling film (plastic wrap) and leave in a warm place for an hour or so until it has doubled in size.  If your house is cool (like ours), cover with oiled foil and place in the oven at 40C / 100F for an hour.
  4. When the dough has risen, knead for a further 10 minutes then divide into 12 or 15 equal size balls.  To ensure that the buns are exactly the same size and bake evenly, I weigh the dough.  My dough tends to weigh about 1.125kg, so I tear off 75g for medium size buns.  Roll the dough into smooth balls and evenly space out on a large baking tray (28 x 40cm / 10 x 15”) lined with non stick baking paper.  Cover with the damp tea towel, oiled cling film (plastic wrap) or foil and leave in a warm place for 45 minutes or so, until they have risen.
  5. Heat the oven to 200C (190C fan) / 400F.
  6. To make the crosses, mix 3 tbsp plain (all purpose) flour with 2 tbsp water to form a thick paste.  Spoon into an icing bag with a thin nozzle (or a plastic freezer bag and snip the corner).  Slowly pipe along each row of buns, then repeat in the other direction.  Place in the oven and bake for 20 minutes on the middle shelf, until golden brown.
  7. To make the glaze, gently boil the sugar and fruit juice in a small pan for about 5 minutes until it starts to thicken into a syrup.  Brush over the buns while they’re still hot.  Allow to set before serving. These buns are most delicious served warm or toasted.
  8. The buns will last 2-3 days in an airtight container.  They also freeze well.  I tend to slice them in half before I freeze them so that they can be toasted without the need to defrost first.

[/print_this]

UPDATE EASTER 2017
It’s been three years since I posted this recipe and it’s great to hear that people are still finding it useful! I’ve loved seeing all the pics you’ve been sharing on social media, so thank you so much for tagging me! Check out these beauties, that @jameesarah shared on Instagram (you can check out Jamee’s feedback in the comments section below this post).

MORE READER REMAKES ❤️

Back in 2013 when I shared this recipe, it was really difficult to find vegan hot cross buns in UK supermarkets, so I made them myself. Here we are in 2017, and vegan-friendly hot cross buns are available in practically every UK supermarket! Times sure are changing! 🙌🏻

You might also like…

Hot Cross Bun Loaf

N.B. I’ve been a long-standing registered user of mySupermarket and would like to express my gratitude to them for sponsoring this post.

Apple & Cinnamon Dough Balls (Healthy ‘Monkey Bread’)

When I first started blogging, I recall there was a wave of health food bloggers posting recipes for ‘Healthier’ Monkey bread.  I had absolutely no idea what ‘Monkey bread’ was or why it had such a funny name!

Wikipedia soon filled me in…

Monkey bread, also called monkey puzzle bread, sticky bread, African coffee cake, golden crown, pinch-me cake, bubbleloaf and monkey brains is a sweet, sticky, gooey pastry served in the United States for breakfast.  The bread is made with pieces of sweet yeast dough which are baked in a cake pan after first being covered in melted butter, cinnamon and sugar. It is traditionally served hot so that the baked segments can be easily torn away with the fingers and eaten by hand.

Sounds yummy doesn’t it?  However, traditional Monkey Bread isn’t particularly healthy.  It contains A LOT of fat and sugar.  In contrast, the ‘healthified’ versions often use bread or pizza dough as their base, and are glazed with healthier alternatives to butter and refined cane sugar.

One Sunday, I decided to have a go at making some Apple and Cinnamon-Spiced Healthy Monkey Bread as a ‘special breakfast’.  It was a huge hit with Lil’ L and M and,  I must admit, I’m rather partial to it too.

The ‘authentic’ way to serve Monkey Bread is to invert it onto a plate…

Apple and Cinnamon Healthy Monkey Bread

However, we prefer to eat it straight from the pan.  Hands get less messy, and you can use the balls to mop up any syrup left in the pan. 😉

Healthy Apple & Cinnamon Monkey Bread

If you’re lucky enough to have a breadmaker, then this recipe requires very little effort at all.  You simply throw all the dough ingredients in the machine and press a button.   I’ve had my breadmaker for a couple of years now and it’s been fantastic!  I reckon it’s easily paid for itself in terms of the amount of times we’ve chosen to stay in rather than going to Pizza Express!

Today, I made some Monkey Bread as an after-school treat for Lil’ L and his friend, and I made it by hand to see how it compared to the bread-maker version.  To be honest, making dough by hand doesn’t require THAT much effort.  It takes less than 15 minutes, which isn’t too bad at all.  Plus kneading dough is great exercise for the arms.

Below I’ve given instructions for making the Monkey Bread by hand and in a breadmaker.  If you’re planning to eat it for breakfast, you can easily prepare the dough the night before and chill it in the fridge.  In the morning, simply remove the dough from the fridge about 20 minutes before you need to use it.

[print_this]

Makes 18-20 dough balls (serves 3-4)
Hands-on time: 10-30 minutes (depending on whether you make the dough in a breadmaker or by hand)
Dough resting time: 1 hour
Cooking time: 25-30 minutes

Dough
½ tsp fast action/easy blend yeast
300g / 11oz / 2¼ cups wholemeal (wholewheat) bread flour or chapatti flour (I use the latter)
½ tsp sea salt
170ml / 5¾ fl oz / ¾ cup lukewarm water
1 tbsp olive oil

Cinnamon Sugar
1 tbsp coconut sugar (or use granulated sugar)
1 tsp ground cinnamon

Apple Cinnamon Syrup
1 organic apple, cored and chopped (I keep the skin on)
2 tbsp virgin coconut oil (or you could use non dairy margarine, like Pure)
2 tbsp maple or agave syrup (I often use Clark’s Original Maple Syrup)
1 tbsp coconut sugar (or brown sugar)
1 tsp ground cinnamon

Method

  1. Prepare the dough.
    – In a breadmaker: Throw all the ingredients in the pan and select ‘pizza dough’.  The programme should take around 45 minutes.  When it signals that it’s ready, leave the dough in the machine for a further 20 minutes or so to rise.
    – By hand: Place the yeast, flour and salt in a large bowl.  Add the warm water and oil.  Mix well with a spoon, then bring it together with your hands until you have a sticky dough.  Knead for 5-10 minutes, until the dough is smooth.  Place the dough in a lightly oiled bowl, cover with a damp tea cloth or oiled cling film (plastic wrap), and leave in a warm place for about an hour until it has doubled in size.  If your house is cool (like ours) then cover with oiled foil and leave in the oven at 40C / 100F for an hour.  When the dough is ready, remove from the oven, knead for a couple more minutes then set aside.
  2. Preheat the oven to 200C / 400F / Gas 6.  Brush or spray a 23 cm / 9″ loose bottom pan with oil.
  3. Prepare the cinnamon sugar: In a small bowl, combine the sugar and cinnamon.
  4. Prepare the apple cinnamon syrup: First blend the apple into a smooth puree.  I find the easiest way to do this is to place the apple pieces in a bowl and use a hand blender (stick / immersion blender).  Place the apple puree, coconut oil, syrup, sugar and cinnamon in a small pan and gently heat until the oil has melted.
  5. Pull off small amounts of dough and roll them into balls about 2½ cm / 1″ in diameter.  Roll them in the cinnamon sugar and place in the oiled pan.  Repeat until all the dough has been used.  Evenly space out the balls in the pan (they will expand when baking).  If you have any cinnamon sugar left over, add it to the syrup pan.
  6. Spoon the apple cinnamon syrup evenly over the top and in between the dough balls.  Place in the preheated oven and cook for 25-30 minutes.
  7. Serve warm, either inverted onto a plate or straight from the pan.

[/print_this]
I hope you enjoy it as much as this little monkey 😉

Lil L & Monkey Bread


Good Hemp Seed Giveaway Results!
Before I go, I’d like to announce the winners of the Good Hemp Seed Giveaway.  The eligible entries were placed in chronological order and 3 winners were randomly selected using Random.org.

I’m delighted to announce that the winners are…

1. Emma
2. Samantha
3. Penniless Veggie

Please email your postal addresses and I’ll arrange for the gifts to be sent to you asap.


Have a great weekend everyone! xx


Banana Pancakes and Bike Adventures!

Sunday’s special weekend breakfast was one of our all-time favourites … banana oat pancakes.  I’ve been wanting to post this recipe for a while now, but Lil’ L has always managed to eat the pancakes before I’ve got round to taking the photo!  This time, I made a huge batch so he could be happily munching his way through three pancakes while I took a photo of the others. 😉 

We like to serve these pancakes with pecan nuts, blueberries and a light drizzle of agave syrup.

Wanted to get another photo in of the cute plate Sandra bought me 😉

Not only are these pancakes delicious, they’re also super healthy and highly nutritious.  Lil’ L describes these pancakes as ‘glorious!’ and gives them 5 stars. 🙂  The recipe can be found here.

We’ve finally got round to buying a roof rack for the new car, which means we can start going on bike adventures further afield again.  Hurray!  This Sunday, after our fill of pancakes, we loaded the bikes onto the car and decided to go to Longleat in Wiltshire.

We parked the car at Nockatt Coppice car park (love that name!)  The trail starts up high, with a beautiful view of Longleat House and grounds.

 There was an interesting sculpture that was just begging to be laid on. 😉

Let the adventure begin!

There are many trails round Longleat.  The one we chose today took us through an amazing woodland.  Lil’ L’s reading Enid Blyton’s ‘Folk of the Faraway Tree’ at the moment, and he said that this tree was exactly how he imagined the Faraway Tree to look. 😉

Apparently the next section of the wood looks just like the Ewok’s forest in Star Wars. 

After following the trail through the woods, we popped out by the lake at Shear Water.  There was a very cute cygnet with its mum and dad. 

After consulting the map, we were pleased to find that there was a cafe less than a mile away.  Bike rides are always more fun when they involve stops at cafes. 😉 

The cafe turned out to be a very cute tearoom in a thatched house.

My beloved Marin took a well-earned rest on the grass.

We had our fill of beans on toast and coffee, then we headed back to Nockatt Coppice.  It was a great day out!  I’m already looking forward to our next bike adventure. 😉