Raw Chocolate Banana Ice Cream

Since we’re enjoying a late summer here in the UK, I thought it would be fitting to show one of our current favourite desserts … raw chocolate banana ice cream.

It’s so simple to make… even simpler if you’ve got a food processor 😉

You simply slice some very ripe bananas and place them in a freezer bag overnight.

Place the banana slices in the food processor, along with some raw cacao powder (regular cocoa powder will work fine too) and a teaspoon of pure vanilla extract. I also add a teaspoon of virgin coconut oil to make the ice cream even creamier.

Whizz in the processor until it’s nice and smooth*. Add a little natural liquid sweetener to taste (I use agave syrup) and some cacao nibs or choc chips if desired. Pulse a few times to combine and then it’s ready to go!

* Before I had the food processor, I used to pulse the ingredients in my blender to break up the banana (scraping down a few times), then I transferred it to a bowl and used my stick blender to blend it to a smooth consistency. It turns out the same… just takes a little more effort than with the F.P.

The ice cream can be served straight away as soft serve, or frozen for a few hours if you wish to scoop it into balls. In the freezer, the ice cream will last weeks.

We love to serve the ice cream with a drizzle of home-made chocolate sauce (recipe coming soon!), and a sprinkling of flaked almonds and cacao nibs.

This ice cream is not only simple to make, but it’s cheap (a great way of using up over ripe bananas!), it’s packed with nutrition, it’s dairy free, it has no refined sugar and it’s low fat. It also happens to be totally scrummy. Now that’s my kind of treat! 🙂

Here’s the printable recipe…

[print_this]

Serves 4
Hands on time: 5 minutes

Ingredients
4 ripe bananas, sliced into coins and frozen overnight
3 tbsp raw cacao powder (regular cocoa powder will work too)
1 tsp vanilla extract
1 tsp virgin coconut oil (optional, but worth adding)
4 tbsp cacao nibs or choc chips
1-2 tbsp agave syrup or fruit sweetener, to taste

Method

  1. Place the frozen bananas, cacao powder, vanilla extract and coconut oil in a food processor and blend until smooth. Add the cacao nibs or choc chips, and liquid sweetener (to taste). Pulse to combine.
  2. Serve immediately as soft whip, or return to the freezer for a few hours for a firmer ice cream.

[/print_this]

For more info about raw chocolate and its wonderful properties, see this post.

What’s your favourite ice cream flavour?
I’d love to try a nutella version next… maybe using our home-grown cob nuts.

Have a great weekend everyone! xx

This time last year… A Wonderful Summer

Raw Peach Cobbler (dairy free / sugar free / no added fat)

Hi Everyone!

I hope you’re having a great week so far 🙂

Look what we’ve had in Bath these past couple of weeks …

yes, that is indeed a clear blue sky with not a single rain cloud in sight 🙂

Summer finally appears to have arrived! It’s been so nice to spend time outside without the umbrella 🙂

School started back this week, but the beautiful weather has softened the blow. Some mornings we’ve walked along the river path to school, which has been a lovely way to start the day.  After school, we’ve been heading straight to the park, which has been a great opportunity for me to catch up with the other mums. What a difference a bit of dry weather makes!

But despite all this beautiful weather, now that the school break is over, it’s time for me to start focusing on planning this term’s kid’s meditation workshops, studying for an imminent Buddhist exam…  and getting that cook book finished!!!

Last month, I finally got round to purchasing a food processor. I started looking at food processors last December, but didn’t want to rush into buying one until I knew, for sure, that I needed one and would use it regularly enough to justify the expense.

This year,  I’ve been making lots of raw desserts which use dates as a sweetener and binder. Unfortunately, my mini chopper was just not powerful enough to chop dates. Even if I pre-soaked the dates to soften them, the chopper would start smoking where the motor had started to burn. I also blew up a stick blender trying to chop dates. Basically, I needed something more powerful.

Thanks to my kind, generous family, I had enough birthday money to purchase this sturdy piece of equipment…

The motor has a 12 year guarantee, so this one should be a safe investment.  I’m amazed how effortlessly the processor chops dates and nuts. In no time at all, they’re totally obliterated!

One of our favourite desserts this summer has been raw peach cobbler. It’s so simple to make. Dates, almonds and walnuts are whizzed in the processor to make a course meal (this literally takes a couple of minutes…)

then sprinkled on top of sliced peaches (I use tinned peaches as fresh peaches in UK supermarkets seem to taste so bland)…

we then drizzle a little Alpro chilled soya cream on top as a finishing touch.

I tend to make a large batch of the cobbler and keep it in the fridge (it easily keeps for 2 weeks).

Here’s how I make it…

[print_this]

Serves: 4
Preparation: 2 minutes

Ingredients
47g /  1¾ oz / ¼ cup soft dates
80g / 2¾ oz / ½ cup mix of raw almonds and walnuts
1 tsp pure vanilla extract
pinch sea salt
drizzle of agave syrup (optional, to taste)

2 x 400g canned peach slices in natural juice (or 3-4 sweet fresh peaches, sliced)

Non dairy cream (I use Alpro chilled soya cream) or ice cream

Method

  1. In a food processor, pulse the dates, nuts, vanilla extract and sea salt until they resemble a course meal. Add agave syrup, to taste.
  2. Arrange the peach slices in four small bowls or ramekins. Top with the cobbler. To make it even more special, add a scoop of ice cream or drizzle of non dairy cream before serving.

[/print_this]

As well as peaches, this raw cobbler is also delicious served on top of other fruits, such as berries, mango or pineapple.

Have a fantastic weekend everyone 🙂

I hope the sun is shining wherever you are xx

This time last year…  A Beautiful Time en Provence

Lush Berry Jelly (Jello) (vegan/sugar-free) & Triple Berry Milkshake

The other day, M arrived home from work with the most incredible bounty of berries and currants that he’d acquired from Cobbs Farm in Hungerford. There were punnets galore of strawberries, raspberries, blackberries and red currants.

Not only did they look amazing, but they smelt incredible too. Within a couple of minutes of arriving home, the whole house was filled with the smell of sweet berries. I couldn’t wait to tuck in 🙂

And the taste? Oh my word. They are so good. The strawberries in particular blew me away. They are, without doubt, the tastiest strawberries I’ve ever come across. I wish you could try them too!

Since berries don’t keep for very long, I froze the majority of the fruit, but I did keep a couple of punnets in the fridge for us to enjoy over the next day or two.

The following day, Lil’ L and I set to work making some berry jelly (jello).

Instead of using gelatine (which is a slaughterhouse by-product), we use agar-agar flakes, which are made from a nutrient-rich sea vegetable.

I bought mine from our local health food store (Harvest on Walcot St), but it’s also available from Waitrose.

While shop-bought jelly tends to be laden with refined sugar, artificial colouring and very little (if any) nutritional value, our home-made jellies are made with fresh fruit and fruit juice. These jellies are brimming with antioxidants and vitamins and taste totally lush. They make a great dessert or treat for adults and children alike (Lil L loves them!)

Vegan Berry Jelly / Jello

They’re super easy to make too.

Here’s how we make them…

[print_this]

Fresh Berry Jelly (Jello) (Vegan / Sugar Free)

Serves: 3-4
Hands-on time: 10 minutes (+ chilling time) 

Ingredients
1½ TBSP agar agar flakes

120ml / 4 fl oz / ½ cup water
240 ml / 8 fl oz / 1 cup apple juice
160g / 5½ oz / 1 cup chopped berries
2 TBSP maple syrup or other liquid sweetener, to taste

Method

  1. Whizz the fruit juice and berries in a blender until smooth. Pour through a fine mesh sieve into a jug and discard the pips.
  2. Heat the water and agar agar flakes in pan. Bring to the boil, reduce the heat and simmer for 3 minutes or so, stirring constantly until the flakes have dissolved. Whisk in the blended fruit juice and syrup. Bring back to the boil, then reduce the heat again and simmer for a couple of minutes or so, stirring continuously until the agar agar flakes have completely dissolved. To check this, scoop up a spoonful or two of the mixture and pour it back into the pan – if the flakes aren’t fully dissolved, you’ll see them sticking to the spoon.
  3. Once ready, remove from the heat and leave to cool slightly. Taste test and add more sweetener if desired. Pour into small glasses or ramekins and refrigerate until set (about 1 hour).

Variations
– To make a simple fruit juice jelly, replace the cup of berries with another cup of fruit juice.

-If you wish, you can add whole fruits or fruit slices (e.g fresh raspberries or peach slices) to the jelly. I’ve heard that kiwi and pineapple contain enzymes that prevent the agar agar from setting, so best to avoid these fruits.

[/print_this]

We’re also using the berries to make Triple Berry Milk Shakes. They are so lush! Into the blender goes…

– 1 cup of almond or soya milk
– 1 cup berries (blueberries, blackberries, raspberries) (I tend to use a mix of fresh and frozen berries so that the shakes are nice and cool)
– 2 tbsp plain soya yoghurt (I use Alpro)
– 1 tbsp chia seeds (for a nutrient boost)
– drizzle of maple or agave syrup

For a breakfast smoothies, we’ll also add in 2 tbsp fine oats or some ground almonds.

We pulse the ingredients for a few seconds to break up the fruit, then whizz them on high speed for a couple of minutes.

Berry Milkshake 400

Lately, we’ve also made lots of fresh fruit (dairy free) ice cream, frozen yoghurt, and fresh fruit jelly sweets (recipes and photographs coming soon). All yummy, healthy desserts and treats 🙂

I was so impressed with the fruit from Cobbs Farm and I’m really looking forward to visiting the farm in person.  I read on their website that you can either buy the fruits from their farm shop or go and pick your own. They also have a deli, vineyard and a cafe that serves coffees, cakes, cream teas and Sunday lunches.  Sounds like a great place to spend a Sunday!

I hope you’re all having a great summer so far.  The Olympics have been fantastic haven’t they? Are you inspired to take up any new sport? I fancy trying beach volleyball … but I’m wondering whether the skimpy knickers are compulsory. I’m way too old to rock that look 😉

The Amazing Spiderman, A Birthday Party, the Tour de France & Key Lime Bars

Hi everyone! I hope you’re having a great week 🙂

Still no signs of Summer here in Bath! (Will it ever arrive I wonder?) Last Saturday it rained non stop all day so we decided to go to the cinema and watch the new Spiderman film. It seemed like the perfect way to spend a wet, rainy afternoon and we hadn’t been to the cinema in ages.


We all thoroughly enjoyed the film. It’s very different to the previous Spiderman trilogy. The new film seems to be more targeted at teenagers than the previous films but, despite it being a 12A, Lil’ L absolutely loved it and didn’t find it too scary at all.

 On Sunday afternoon the sun made a rare appearance! It was perfect timing as it was our lovely friend Joni’s birthday and she had a little gathering at her house to celebrate.

Me & Joni (pic taken by Lil’ L)

It was so lovely to see Joni and all her family. Lil’ L had a great time playing with Joni’s 3 grandchildren.

Joni & Derek put on an amazing spread of buffet food, including a roasted vegetable dairy-free quiche which I must have a try at re-creating. It was delicious!

During the afternoon we kept popping into the living room to check how Andy Murray was doing in the Wimbledon final. Needless to say he lost, but it was a great match all the same.

In our house, the most popular sporting event of the year is the Tour de France. As well as enjoying the race itself, I love all the spectacular scenery you get to see as they make their way across France. 

[Source]

Bradley Wiggins is currently in the yellow jersey and he’s a strong candidate to win overall. If he does win, he’ll be the first Englishman to win the Tour ever! Go Brad!

 [Source]

So what have I been up to since the weekend? Well, I’m still busy working on the family cook book.  I’m hoping to get all the writing drafted before Lil’ L breaks up from school so I really need to get a move on!

I’ve also been enjoying reading Ani’s Raw Food Desserts which my sister bought me for my birthday and trying out some of Ani’s recipes, as well as my own raw dessert creations.

The first recipe I tried from Ani’s book is one of her signature sweets – the Raw Lime Kream Bars. The ingredients are very similar to those I using for making raw cheesecakes. I quartered the original recipe and made 28 Lime Kream Mini Bars. They are really refreshing, especially if you eat them straight from the freezer. Perfect as an after dinner treat.

After taking this pic, I coated some of the mini bars in raw chocolate. They’re yummy but, for me, the chocolate detracts from the zingy lime flavour. In future, I’ll stick to the original version.

Here’s how I made them:

[print_this]

Ani Phyo’s Raw Key Lime Kream Bars

Ingredients
1 cup raw cashews (soaked overnight)
1/4 cup lime juice  (which I made from about 3 freshly squeezed limes)
1/8 cup agave syrup
1/8 cup liquid coconut oil (I placed the coconut oil in a bain marie to melt it)
1/4 cup water, as needed

Method
Combine the cashews, lime juice, agave syrup and coconut oil in a blender, and blend on high speed, adding water as needed. I stopped the blender a few times to scrape down the sides and remix. Keep blending until the mixture is completely smooth. Scoop the mixture onto a non stick tray or into a square container. Smooth with a knife to desired thickness. Freeze until chilled (2-3 hours, or overnight). Cut into mini bars and serve. These treats are best stored in the freezer and will keep for weeks.

[/print_this]

If you find cashew nuts are a little pricey, check out Indian supermarkets or the Indian aisle in larger supermarkets. Asani’s 750g bag of cashew nuts is currently selling  for £4.99 (66.5p per 100g)  which is half the price of any other brand. I’m definitely going to stock up on my next shop!

Enjoy the rest of your week everyone! I hope the sun is shining wherever you are! 🙂 xx

This time last year…. I’m Running a 10K to Raise Money for Macmillan

London, Whole Foods, Saf & Raw Chocolate Pecan Bark

Hi everyone!  I hope you all had a great weekend!

I was lucky enough to start my weekend a day early, with a trip to London on Friday to spend the day with my gorgeous friends Helen and Naomi, and Naomi’s beautiful 9-month old daughter.  It was really good to see them, and I had such a great time! 🙂

I met them in Kensington and we headed to Whole Foods which is located in the historic Barkers Building on Kensington High Street.

I’ve heard so much in blogging world about Whole Foods and I never thought that I would actually get to go there myself.  It was health food heaven!!!  It was so beautifully laid out.  Just visiting the store was an incredible experience in itself!

[Source]

But just as I thought the day couldn’t get any better, we hopped in the glass elevator and went upstairs to the Saf Restaurant.  ‘Saf’ stands for ‘Simply Authentic Food’ and also means ‘Pure’ in Turkish. You can find out more about their mission and philosophy on their website.

I just couldn’t believe my eyes when I saw the menu.  It was 100% plant-based!  That means I could eat anything on the menu!  That is seriously a first for me!

Everything sounded so delicious that I wish I could have tried it all.  To be fair, I did manage to get through quite a lot of the menu 😉  Between the three of us, we ordered a range of dishes to sample, which included the following…

Curried Kale Crisps – Raw marinated and dehydrated Kale crisps flavored with curried coconut flakes

Saf Cheese Trio – A selection of their signature, olive, herb and smoked paprika ‘cheeses’, served with flax crackers, raw quince jam and drizzled with herb oil

Spinach and Date Gyoza – Organic madjol date, spinach, caramelized onion and chive dumplings, served with black vinaigrette

Saf Banh Mi – Kentish flute baguette with their trademark vegan mayonnaise, kimchee, roasted aubergine, maple glazed tofu and torn fresh mint and coriander

Vietnamese Wrap – Rice paper wrap with pickled daikon radish, maple glazed tofu, mixed salad leaves and their own miso-sambal sauce

Saf Burger – Seasonal vegetable patty, grilled onion, gherkin, tomato, gem lettuce with homemade tomato fig jam and special tarragon aioli served on a wholegrain bun

… plus 3 different salads!

I was totally blown away by the food!  I don’t think I’ve tasted anything like it before.  So, so tasty!

After a breather to let our meal go down, I couldn’t leave the restaurant without trying one of their desserts.  Well, two actually 😉

Chocolate & Orange Torte – Raw cocoa & cashew cream ganache with cocoa nib & cashew crust served with orange bubbles

Butternut Cheesecake – Butternut & cashew cheese with a coconut & lemon zest base served with champagne sabayon

I nearly didn’t try the latter because the name put me off.  Butternut cheesecake?  Mmm, didn’t sound very appetising but I was intrigued.  It turned out that the cheesecake was absolutely stunning.  Probably the best cheesecake I’ve tasted in my life!  I would so love to try and re-create it at home.

Saf has an Iphone app which provides the recipes for a selection of their dishes.  Unfortunately, I haven’t got an Iphone myself but hopefully I’ll be able to borrow a friend’s or ask a friend to download the recipes for me.

In summary, Saf is a fantastic plant-based dining experience in a beautiful environment.  If you’re ever in London, you must check it out!

After a wonderful day in London with my friends, I returned to Bath fired up with enthusiasm for plant-based cooking and experimenting with new recipes.  Not least because I was armed with a brand new cook book that Naomi had bought me for my birthday called ‘Veggiestan’. Thank you Naomi!

The author writes a blog under the same name, which is really worth checking out.

My family loves middle-eastern food, so I can’t wait to start trying out Sally’s recipes.  The book is beautifully designed and makes a great read.  I actually started reading it in bed on Saturday morning with a cup of coffee.  Is that sad or what?  Please tell me I’m not the only one that sits in bed reading cook books!!

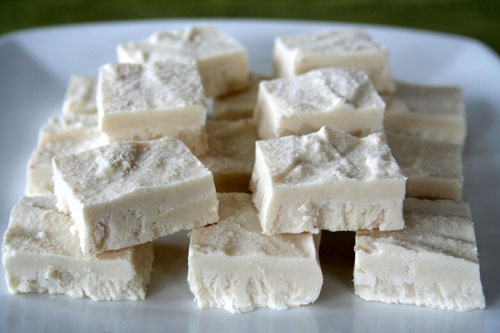
So, all fired up, I spent this morning in the kichen creating a variety of baked goods for this week’s lunchboxes and some raw chocolate goodies.  As well as making some goji hearts to send to Becca (the winner of my giveaway 🙂 ), I also made some raw chocolate pecan bark. Using raw ingredients allows the chocolate to retain all its wonderful antioxidants and other nutritional qualities.  I also opted to use Sweet Freedom Fruit Sweetener instead of sugar.  The result? A home-made chocolate bark that’s packed with nutrients, low GI and suitable for diabetics.  Happy days! 🙂

It also tastes scrumptious!

And it’s super quick and easy to make!

Fancy having a go?

Here’s the recipe:

[print_this]

Raw Chocolate Pecan Bark

Preparation: 10 minutes
Cooling time: about 30 minutes

Ingredients
65g / 2 1/3 oz raw cacao butter
50g / 1 3/4 oz raw cacao powder
1/4 tsp vanilla powder (optional)
2-3 tbsp Sweet Freedom fruit sweetener, to taste (agave syrup will also work)
1/2 cup pecan nuts, chopped
Pink Himalayan salt (optional)

Method

  1. Add a small amount of water to a saucepan and place a heat-proof bowl on top.  Gently heat the water.
    Note: Throughout the chocolate-making process, make sure that the water stays on a very low heat.  You don’t want the water to be boiling or for steam to be escaping out the sides of the saucepan.
  2. Line a baking tray with a silicone mat or non-stick baking paper.
  3. Finely chop or grate the cacao butter and place it in the heat-proof bowl.
  4. Once the cacao butter has melted, whisk in the cacao powder.  Add the vanilla powder (if using) and 2-3 tbsp liquid sweetener, to taste.  Mix in half the chopped pecan nuts.
  5. Tip the chocolate onto the prepared tray and use a knife to spread to the desired thickness.
  6. Sprinkle on the remaining pecans and lightly press into the chocolate.  Sprinkle on some Pink Himalayan salt, if desired.
  7. Allow to cool before transferring to the refrigerator.  Once set, cut to the desired size using a sharp knife, or break into pieces. (For me, the ingredient quantities yield 20 bite-size squares).

[/print_this]So where can you buy raw chocolate making ingredients?  Some local health food shops stock them.  In Bath, you can buy them from Harvest, on Walcot Street.  I also buy my ingredients from Elements for Life, which has on online shop.  For those interested in trying out raw chocolate making, the Elements for Life Raw Chocolate Making Starter Kits are great.  They include raw cacao butter, raw cacao powder, Sweet Freedom fruit sweetener and a heart silicone mould, all for just £14.99.  These also make great gifts for dark chocolate lovers.

Lil’ L absolutely loves raw chocolate and, given its fantastic nutritional profile, I’m happy for him to eat it on a regular basis.  In fact, I would even encourage it.  As well as the raw chocs, I also add raw cacao powder to his smoothies and use it in desserts.

Since visiting Saf, I’m fired up to try making more raw desserts and treats.  I’ve already got a few ideas for new recipes, so I’ll test them soon and let you know how I get on.  Are you a fan of raw desserts?  If so, what’s your favourite?  Please send me links to your favourite recipes so I can check them out.

Have a great week everyone!  The Olympic Torch arrives in Bath tomorrow, so you can imagine how buzzing the city is at the moment!


Delicious Orange & Almond Cake (Dairy-free & Vegan)

Inspired by the yummy orange and almond cake that I had at the Holburne Museum Garden Cafe last week, I thought I’d attempt to bake an orange and almond cake myself.

And guess what?  …

It wasn’t a flop!

Look, it’s even cake shape (unlike last week’s brownie gloop which I had to turn into a chocolate ‘pudding’).

This cake is beautifully moist and has the most delicious almond flavour with a hint of orange.

AND, it’s got lots of lovely goodness in it, including B vitamins, vitamin C, vitamin E and a few minerals to boot. The cake’s also low GI, so it gives us slow release energy rather than those horrible refined sugar energy spikes.

AND it’s easy to make.  Even for me!  (and if I can bake it, you definitely will be able to!)

One of my study group friends said it’s the best cake I’ve ever made.  (To be fair, I haven’t set the bar very high with my attempts at baking, but it’s wonderful to hear that I’ve actually made something that’s more than edible).

M and Lil’ L absolutely loved it.  In fact, Lil’ L said it was one of the best cakes in the world!  For this reason alone, I think this cake deserves its own blog post.  So here it is.

[print_this]
Unlike regular cakes which are full of ’empty’ calories, this cake is packed full of vitamins, minerals, antioxidants, protein and fibre. It also provides slow release energy thanks to the wholegrain flour and almonds. I would class this cake as a healthier ‘eat any time’ kind of cake, though some of my readers have served it at parties and told me that it went down a treat. It can easily be prepared in advance. In fact, we find it tastes even better a day or two after baking.

Ingredients
140g / 1 cup fine wholemeal (whole wheat pastry) flour or chapatti flour
140g / 1 cup plain (all purpose) flour
1½ tsp baking powder
½ tsp bicarbonate of soda (baking soda)
½ tsp salt
100g / 1 cup ground almonds (almond meal)
100ml / ½ cup organic rapeseed (canola) oil or other neutral-flavoured oil
150ml / ½ cup + 2 TBSP soya or almond milk
200ml / ⅔ cup maple syrup
½ TBSP zest from an unwaxed/organic orange
60ml / ¼ cup freshly squeezed orange juice
1 tsp orange extract
½ tsp almond extract

Decorating options:
Orange Cashew Cream Frosting (see below) or apricot fruit spread (e.g. St Dalfour)
3 TBSP toasted flaked almonds, crushed

Method

1  Preheat the oven to 180C (160 fan) / 350F.  Grease the sides of a 20cm / 8 inch loose-bottomed cake tin with oil and line the bottom with non-stick baking paper.

2  Sift the flours, baking powder, bicarbonate of soda and salt into a large bowl. Tip any remaining wheat germ into the bowl. Add the ground almonds and stir through to combine.

3  In a separate bowl, use a fork to whisk together the oil, milk, syrup, orange zest, orange juice, orange extract and almond extract until fully combined.

4  Make a well in the dry ingredients, pour in the wet ingredients and stir to combine (but do not over mix).  Pour the batter into the prepared tin.

5  Bake for 45 minutes, or until the cake is lightly browned and springs back when lightly pressed. Leave the cake to cool in its tin until completely cooled (it will firm up as it cools).

6  Decorate with frosting or apricot fruit spread and sprinkle toasted flaked almonds on top. Lightly press down on the almonds so that they stick. Chill in the refrigerator before serving.

7  Stored in an airtight container in the refrigerator, this cake will keep for up to 5 days. It also freezes well.

[/print_this]

[print_this]

Orange Cashew Cream Frosting

Yield: about 240g / ¾ cup
Hand on time: 10 minutes    Ready in: 70 minutes

Ingredients
110g / ¾ cup raw cashews
55 ml / 3 TBSP maple syrup
½ TBSP zest from an unwaxed/organic orange
30ml/ 2 TBSP freshly squeezed orange juice
1 tsp orange extract
½ tsp vanilla extract
45g / 3 TBSP virgin coconut oil, melted

Method
1  To soften the cashews,  boil them in a pan of water for 15 minutes or soak in freshly boiled water for 30 minutes. Rinse in cold water and thoroughly drain. 

2  Place the cashews in a food processor along with the syrup, zest, orange juice, orange extract and vanilla extract. Process until the cashews are ground into a creamy mixture. Stop now and then to scrape down the bowl. Add the melted coconut oil and continue blending for a few minutes until the mixture is completely smooth. Taste test for smoothness.

3  Scoop the frosting into a bowl and chill for one hour, or until firm enough to spread. The frosting will keep for 5 days in the refrigerator. It is also freezable

[/print_this]

Have a wonderful weekend everyone! I hope the sun shines wherever you are!