Vegan Cornbread – Great Accompaniment to Mexican Chillis & Soups (Dairy free / Egg free)

What glorious weather we’ve had this week in the UK!  The blue sky and sunshine has been very welcome indeed.  I doubt that it will last but I’m determined to make the most of it while it’s here 🙂

Since it’s been so warm, we’ve had some lighter dinners this week.  On Tuesday, we had one of my all-time favourite soups – Mexican Black Bean Soup – which we served with some toasted tortilla segments and a side dish of cornbread.

Mexican Black Bean Soup

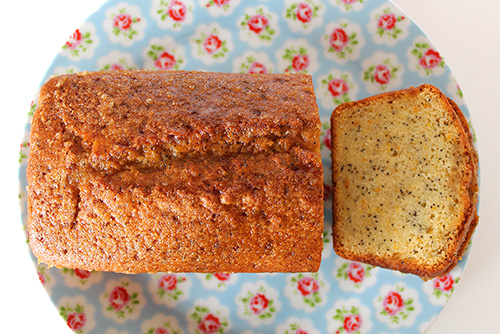
I’ve tried many cornbread recipes over the years, but they’ve never suited my family’s tastes.  The American recipes tend to be too sweet, while Hugh Fearnley-Whittingstall’s recipe (which only uses cornmeal rather than a mix with wheat flour) was too overpowering for us.  It was also really dry (or maybe that was down to me).  M didn’t even think the ducks would like it, so we ended up throwing it in the compost!

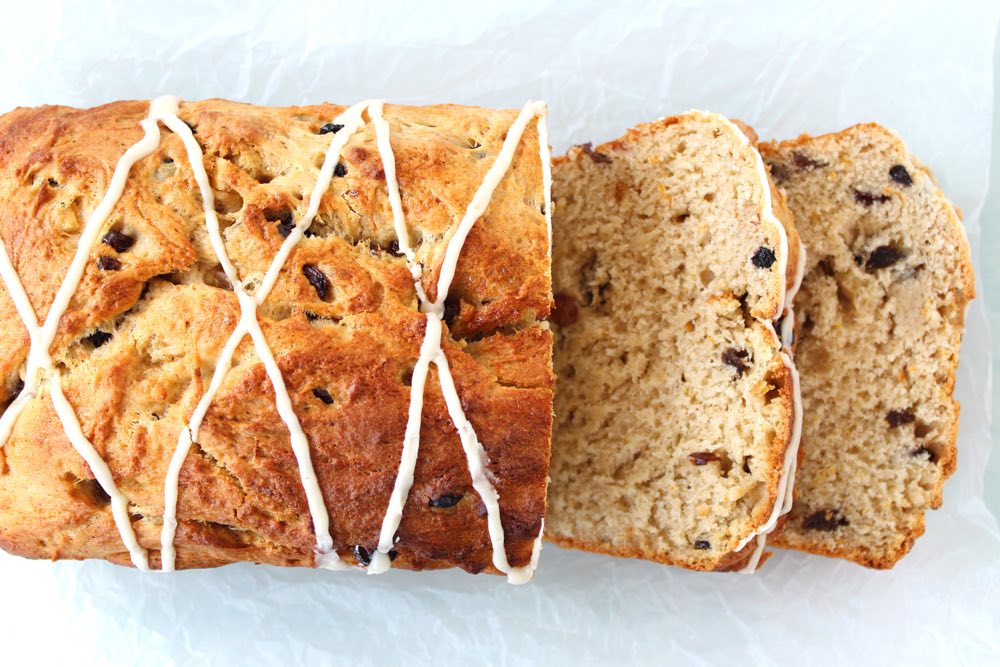
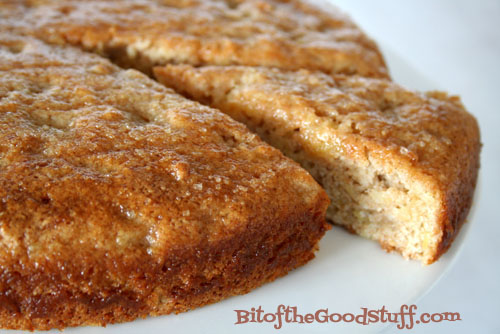
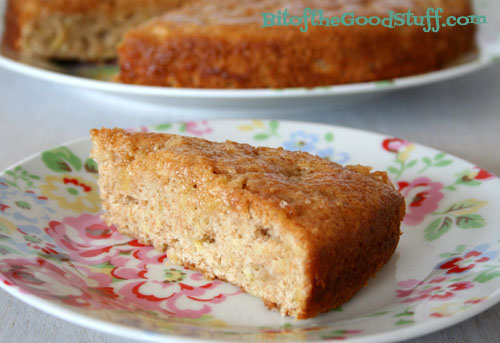
Anyway, I’m relieved to say that my third attempt of the week turned out really well.  I revisited my old cornbread recipe and tweaked it slightly, adding more liquid and some apple cider vinegar so that it was lighter and less dry.  I really liked the texture of this latest batch – it had a lightly crisped exterior and fluffy, moist interior.  It was perfect for dipping into the soup and didn’t need any margarine or oil on it.  The quantities made 9 large slices, so I’ve frozen the remaining slices for future Mexican dishes.

Vegan Cornbread

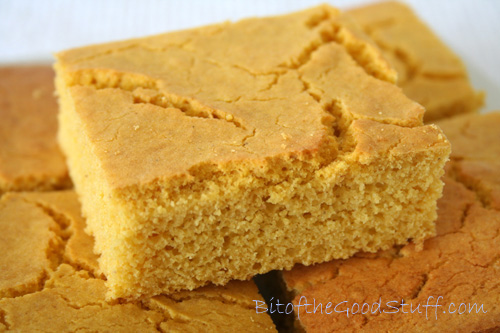
This cornbread recipe may not be authentic, but it’s got great texture and flavour (plus it’s 100% plant-powered!)  It’s very simple to make, requires little hands-on time and will be ready in 30 minutes.  Prepare the bread first and it can be baking while you cook your Mexican dish.

Here’s the recipe:

[print_this]

Serves 4-6
Hands-on time: 15 minutes    Ready in: 60 minutes

Ingredients

480 ml / 2 cups soya milk
2 tsp apple cider vinegar
140g / 
1 cup fine yellow cornmeal
140g /1 cup fine wholemeal (whole wheat) flour or chapatti flour
1½ tsp baking powder
½ tsp bicarbonate of soda (baking soda)
1 tsp salt
50ml / ¼ cup organic rapeseed (canola) oil or other neutral-flavoured oil
1 TBSP maple syrup

Method

1. Pre-heat the oven to 180C (160C fan) / 350F. Grease a 20cm / 8 inch baking pan and line the bottom with non-stick baking paper.

2. Whisk together the milk and vinegar in a large mixing bowl and set to one side for a couple of minutes.

3. Place the cornmeal, flour, baking powder, bicarbonate of soda and salt in another bowl and stir to combine.

4. Whisk the oil and syrup into the milk and vinegar.

5. Sieve the dry ingredients into the wet ingredient bowl roughly in thirds, whisking each time until smooth before adding the next third. Stir in any remaining wheatgerm from the sieve.

6. Pour the mixture into the prepared pan and bake for 30 minutes, or until a skewer inserted into the middle comes out clean.

7. Leave to cool for 15 minutes. Run a knife round the edge to loosen the bread, then invert onto a chopping board so you can peel off the baking paper. 

8. Stored in an airtight container, this bread will keep for up to five days in the fridge or for weeks in the freezer. Warm through before serving. 

[/print_this]


Have a great weekend everyone! xx

Have you tried corn bread before?  If so, do you prefer it sweet or savoury?

SaveSave

SaveSave

SaveSave

SaveSave

SaveSave

Almond Cookies (Dairy Free, Egg Free, Vegan)

After one of the coldest Springs on record, the weather is finally starting to warm up.  Like us, the garden is loving it!  The Aquilegias (‘Granny’s Bonnet’) are out in full force…

Aquilegia - June 2013

and the peonies have started to bloom.

Peony May-June 2013

We had zero fruit on the apple and plum trees last year due to the poor weather conditions, but things are looking better this year.  Even the tiny apple tree growing in our rockery is covered in blossom.

Apple Tree & Peony - May-June 2013

Hopefully we’ll have lots of homegrown apples come September 🙂

Apple Blossom - May-June 2013

The weather is still very patchy at the moment though.  One day we have glorious sunshine and it’s warm, while the next day it can be cold and dark, with non stop rain.  I don’t know when (or if) the weather is going to settle down this year, so we’re just going to have to make the most of the sunshine when it appears.

This morning, before heading out on our bikes, Lil’ L and I decided to bake some Cinnamon Fruit Loaf and Almond Cookies.  As soon as the cookies were baked, we headed out into the garden to enjoy them along with a cup of raw hot chocolate.

Lil L, Almond Cookies & Hot Choc in the Garden 1

In fact, it was so sunny this morning that we needed to wear sun glasses!

Lil L, Almond Cookies & Hot Choc in the Garden 2

The almond cookies were really yummy!  Straight from the oven, they were crunchy on the outside with a softer centre.  We used chapatti flour which is so fine that you wouldn’t even guess that these cookies were wholegrain!  To boost the almond flavour, we added a little almond extract which gave them a hint of marzipan.  Next time round, we’re going to toast the almonds first to see if we can boost the almond flavour even more.

Vegan Almond Cookies

Here’s how we made them:

[print_this]

Makes: about 18 cookies

Ingredients
140ml / 4¾ fl oz / 2/3 cup rapeseed (canola) oil
155g / 5½ oz /¾ cup unrefined caster sugar
60ml / 2
fl oz / ¼ cup soya milk (or use almond milk)
1 teaspoon almond extract
1 teaspoon vanilla extract
200g / 7 oz / 1½ cups fine wholemeal (wholewheat) flour (I use chapatti flour)
1 tablespoon semolina
½ teaspoon bicarbonate of soda (baking soda)
½ teaspoon salt

100g / 3½ oz / 1 cup flaked almonds

Method

  1. Preheat the oven to 180C / 350F / Gas 4.  Line 2 large baking trays with non stick baking paper.
  2. Place the sugar, oil and milk in a large bowl and use a fork to whisk the mixture until it is smooth and caramel-like (about 2 minutes).  Mix in the almond and vanilla extracts.  Sift the flour, semolina, bicarbonate of soda and salt into the bowl and stir until fully combined.  (If your wheat flakes are too big to be sifted, simply whizz them in a grinder, food processor or mini chopper until they are fine).  Mix in the flaked almonds.
  3. Scoop a rounded tablespoon of dough and place on the prepared baking tray.  Press down to flatten the dough slightly.  Repeat with the remaining dough, placing the cookies about 5cm / 2 inches apart on the tray (they will spread as they cook).  Place in the middle of the oven and bake for 10-15 minutes, until lightly browned round the edges.  Remove from the oven and leave for a few minutes before transferring to a cooling rack.  When completely cooled, store the cookies in an airtight container.

[/print_this]

Fuelled up from our ‘elevenses’, we headed out on our second bike ride of the weekend, this time along the beautiful Kennet & Avon Canal…

Riding along the Kennet & Avon Canal Towpath

passing through the lush green countryside and wildflower meadows round Monkton Coombe, followed by a ride through the Bath Two Tunnels (it was so cool in there!)

Two Tunnels

then onto Bath city centre for cappuccinos & smoothies.    It was absolutely glorious!

I hope you had a lovely weekend too and I wish you all the best for the week ahead 🙂

What was the highlight of your weekend?

Vegan Lemon Poppy Seed Muffins & Our 2nd Mother’s Day Treat

I hope all the international mothers had a wonderful day of rest, relaxation and pampering last Sunday 🙂  Unlike the rest of the world, here in the UK we celebrate Mother’s Day in March rather than in May but, despite this, last Sunday did feel like Mother’s Day as we had lovely day out with my parents’ in law at Wisley Gardens.  We even had some Mother’s Day gifts for my mother-in-law as we didn’t get to her on the UK Mother’s Day.

Rhododendrons at Wisley in May

www.rhs.org.uk/Gardens/Wisley/

Funnily enough, M thought it was Mother’s Day last Sunday as the date was printed on his works calendar.  Shame I didn’t keep my mouth shut otherwise I could have been in for another treat 😉  He said he was going to remind Lil’ L to make me a card.   I didn’t need another card though as the one I received on our first Mother’s Day was perfect.  In fact, I still haven’t put it away as it makes me smile every time I re-read it.  Here’s what he wrote:

My Mothers Day Card 2013

How sweet is that?

He sure knows how to encourage me to keep baking him treats 😉

Since he loves lemon cake so much, I thought I’d treat him (and M) to some lemon poppy seed muffins this week.  I’m happy to report that they turned out really well and received great feedback from the family 🙂  Even though they’re made with wholegrain flour, they’re light, fluffy and moist.

Vegan Lemon Poppy Seed Muffin

This is what they look like inside:

Vegan Lemon Poppy Seed Muffin

They’re very easy to make.  Here’s how I did it:

[print_this]

Lemon Poppy Seed Muffins (Dairy free, Egg free, Vegan)

Makes: 12 muffins
Hands-on time: 10 minutes    Cooking time: 20-25 minutes

Ingredients
280g / 10 oz / 2 cups fine wholemeal (wholewheat pastry) or chapatti flour (I use the latter)
2 tsp baking powder
1 tsp bicarbonate of soda (baking soda)
¼ tsp sea salt
1½ tbsp poppy seeds
100 ml / 3½ fl oz / ½ cup rapeseed (canola) oil
120g / 4¼ oz / ½ packed cup & 1 TBSP unrefined caster sugar (add up to 4 TBSP more sugar if you prefer sweeter muffins)
3 tbsp agave syrup (or maple syrup)
65 ml / 2¼ fl oz / ¼ cup freshly squeezed lemon juice (roughly 2 lemons)
zest of 2 lemons, finely chopped
185 ml / 6½ fl oz / ¾ cup fortified sweetened soya milk (or other non dairy milk)
1 tsp vanilla extract
2 tsp apple cider vinegar
1½ tbsp unrefined demerara (turbinado) sugar

To make gluten-free muffins, use a gluten-free flour blend, like the ones produced by Doves Farm. You may need to add a little more liquid (see instructions on the packet)

Method

  1. Preheat the oven to 180C / 355 F / Gas 4.  Line a muffin tray with paper liners (or use  silicon moulds)
  2. Sift the flour, baking powder, bicarbonate of soda and salt into a large bowl.  (If the wheat flakes are too large to be sieved, grind them finer using a coffee grinder or mini chopper).  Stir in the poppy seeds.
  3. In a separate bowl, whisk together the oil, sugar, syrup, lemon juice, lemon zest, milk, vanilla extract and vinegar until completely combined.
  4. Fold the wet ingredients into the dry ingredients, until just combined (do not over stir).
  5. Spoon the mixture into the muffin cups, filling each about 3/4 full.  Sprinkle a little demerera sugar on top of each muffin.
  6. Place in the pre-heated oven and bake for 20-25 minutes, until a toothpick inserted into the middle of a muffin comes out clean.  Leave to rest for a few minutes, then transfer to a cooling rack.  Once completely cool, store in an airtight container.  These muffins will last a week in the refrigerator and several weeks in the freezer.

[/print_this]


Here’s another of our favourite muffin recipes: Mama Pea’s Blueberry Streusel Muffin

Mama Pea Blueberry Streusel Muffin

And if you like lemon cakes, how about a slice of Vegan Lemon Drizzle Cake?

Lemon Drizzle Cake

I don’t know about you, but I find that muffins are a bit too big for me to eat in one go.  I often slice them and save half in the fridge for another day.  It’s my birthday next month and on my wish list is one of these mini muffin trays.  They look so cute and this muffin size would be perfect for me.  They’ll also be great for lunchboxes (and waistlines) too!

What’s your favourite muffin flavour?  The next two flavours I’d like to try baking are raspberry & coconut, and maple syrup with maple glazed walnuts.  I just need to wait until I have a bit of space in the freezer then I can get recipe testing 🙂


Please note: This post contains an Amazon Affiliate link – if you click on the link and purchase something I will receive a small percentage from Amazon which will goes towards the development of Bit of the Good Stuff. Thanks in advance!


Lanzarote 2013 & Three Ingredient Pineapple Cake

Hi everyone!

I’m back at long last!  Sorry I’ve been away so much longer than expected.  I hope you all had a wonderful Spring break.  While I’ve really valued my ‘unplugged’ time, I’ve been looking forward to my return to blogging world.  I’ve missed you guys!

So what have I been up to?  Well, over Easter, M, Lil’ L and I were very fortunate to escape the freezing cold weather in the UK and head to the Canary Island of Lanzarote.  It was wonderful to spend some quality time with my boys, without all the distractions and ‘busyness’ of life back home.

We enjoyed chilling out on the beach and at cafes, chatting, reading, playing card games and sketching (cartoon drawing was particularly popular this holiday!)

We’re huge fans of Cesar Manrique, and we loved spending time at the sites he designed, including Los Jameos del Agua, Jardin de Cactus and his own house (now a charitable foundation) which is situated in a lava field!

Lanzarote - Jardin de Cactus
Jardin de Cactus, Lanzarote

During the holiday, we also got to spend some quality time by ourselves.  M really enjoyed biking in the volcanic national park…

Biking in Lanzarote - 500

while I loved my daily runs along the coast path and meditation by the sea.

Meditating in Lanzarote 1 - 500

Lil’ L loved playing on the beach, rock climbing…

Playing on the Rocks in Lanzarote - 500

Lil' L at Los Jameos del Agua Lanzarote 2 - 500

and leaping!

Lil L at Los Jameos del Agua 2 Lanzarote - 500

However, in contrast to all this boisterous activity, sometimes you’d walk round the corner and find him meditating!

Lil' L Meditating in Lanzarote - 500

He also spent a lot of time reading.  He got through about seven books! (‘Big Nate’ was a popular read this holiday).

Beach Reading in Lanzarote - 500

We did some great walks along the coast and in the volcanic national park.  Away from the resorts and towns, you could easily start to feel like you were on another planet!

Lanzarote Volcanic National Park 2 - 500

To be honest, when I saw the newspaper headlines about the freezing temperatures and chilling winds in the UK, I wasn’t particularly looking forward to our return.  However, we seem to have brought the good weather back with us.  Perhaps Spring has finally arrived for sure (fingers crossed!)  I’m loving the lighter mornings and evenings too

Inspired by the sunshine and warm weather, I chose to make a pineapple cake for my study class this week.  It was no ordinary cake though… it was fat free, dairy free and egg free!  A friend gave me the recipe a few years ago.  She’d spotted it in a newspaper, but I believe it was originally published by Kim and Rachael of the 4 Ingredients phenomenon.

Fat Free Pineapple Cake - 500 copy

Since it has no fat, its texture is different to other cakes, but it’s delicious none the less.  It’s one of my all-time favourite cakes and I’m happy to report that it got the thumbs up from my study group friends too 😀

Here’s how to make it…

[print_this]

Three Ingredient Pineapple Cake

Serves: 12

Ingredients
250g / 9 oz / 1¾ cups self raising flour*
200g / 7 oz / 1 cup unrefined caster sugar
1 x 432g / 15 oz tin of crushed pineapple

* alternatively use plain (all purpose) or wholemeal (wholewheat) flour and 2 tsp baking powder.  I use chapatti atta flour, which is a very fine wholemeal flour, available in the UK from the world food aisles of Tesco and Asda.

Optional glaze
1-2 tbsp pineapple or tropical juice
2 tbsp granulated sugar

Method

  1. Grease a 22cm / 8½ inch cake tin and line the bottom with non stick baking paper.  Preheat the oven to 180c / 350F.
  2. Sift the flour (and baking powder) into a mixing bowl.  Stir in the sugar.  Add the pineapple (entire contents of the tin, including the juice).  Mix until just combined.  Bake in the pre-heated oven for 40 minutes.
  3. Optional glaze:  As soon as the cake comes out of the oven, prick it all over with a cocktail stick. Brush with juice and sprinkle on some granulated sugar.
  4. Allow the cake to cool completely before removing it from the tin.  Transfer to an airtight container and store in the fridge (or slice and freeze).

[/print_this]

Fat Free Pineapple Cake 2 - 500 copy

I wonder if this cake will work with crushed mangoes too? I’m definitely going to have to give it a try 😉

Have a wonderful weekend everyone.  I hope the sun is shining wherever you are xx

Link of the day: Orange and Almond Cake

Orange & Almond Cake 2

SaveSave

Vegan Lemon Drizzle Cake (Dairy-free / Egg-free)

What colour do you associate with Spring?

For me, it has got to be yellow ♥ 

Everywhere I look at the moment, I’m seeing this beautiful, fresh colour.

In my garden the yellow primroses are in bloom…

Crocuses & Primroses

as are the sweet little narcissus.

Narcissus

It won’t be long before the daffodils are in full bloom too 🙂

Daffodils

As well as being the colour of spring, yellow also happens to be my mum’s favourite colour

Here in the UK, it’s Mother’s Day on Sunday.  I haven’t seen my mum since Christmas so I’m really looking forward to spending the day with her.  Inspired by her favourite colour, I’ve chosen to bake a Lemon Drizzle Cake to give her on Sunday as a little home-made treat.

With its light texture, zingy citrus flavour and flecks of bright yellow zest, I think this is the perfect cake for this season.

Vegan Lemon Drizzle Cake (Dairy Free / Egg Free)

Since I’m giving this cake as a gift, I haven’t ‘healthified’ it to the extreme (I’m sure my mum will appreciate that 😉 ).  However, it is free from dairy and eggs, so will be suitable for anyone with those allergies.

To make the cake super zingy and moist, once it was cooked I pierced it all over with a toothpick and drizzled over the juice from a freshly squeezed lemon mixed in with a couple of tablespoons of granulated sugar (which gives the top of the cake a great, crunchy texture).

Vegan Lemon Drizzle Cake (Dairy Free / Egg Free)

Just in case you fancied trying it for yourself, here’s how I made it:

[print_this]

Serves 8 -10
Hand on time: 15 minutes    Ready in: 2 hours

Ingredients
200g / ¾ cup + 3 tbsp unrefined cane sugar (e.g. golden caster sugar)
2 TBSP maple syrup (or maple blend. I use Clarks Original).
70ml / ⅓ cup organic rapeseed (canola) oil (or other neutral-flavoured oil, like sunflower oil)
240ml / 1 cup soya milk
2 tsp apple cider vinegar
30ml / 2 TBSP freshly squeezed lemon juice
zest of 2 unwaxed/organic lemons
250g / 1¾ cups plain (all purpose) flour
2 tsp baking powder
¼ tsp salt

Drizzle
2 TBSP freshly squeezed lemon juice
2 TBSP Demerara (or turbinado) sugar

Method

1. Grease and line a 2lb loaf tin with non-stick baking paper (or use a non-stick loaf liner).  Preheat the oven to 190c (170C fan) / 375F.

2. In a mixing bowl, whisk together the sugar, syrup, oil, milk, vinegar and lemon juice using a balloon whisk until fully combined. Stir in the lemon zest.

3. Sift one third of the dry ingredients (flour, baking powder, salt) into the bowl and whisk by hand to combine. Repeat with the remaining two thirds, whisking each time.

4. Tip the mixture into the prepared tin.  Place on the middle shelf in the oven and bake for 50 minutes, or until a skewer inserted into the middle comes out clean.

5. Meanwhile, place 2 TBSP juice from a freshly squeezed lemon in a small bowl with the Demerara sugar.  Stir to combine.

6. When the cake is baked, remove from oven and pierce all over with a toothpick or skewer.  Spoon the lemon drizzle evenly over the top of the cake.  Allow to cool in the tin for at least an hour (it will firm up as it cools) then transfer to a wire wrack.

7. Once completely cooled, slice and serve or transfer to an airtight container. The cake will keep up to a week in the  refrigerator.  It also freezes well.

[/print_this]

Have a wonderful weekend everyone


READER REMAKES ❤️

————————————————-

You might also like… Orange Drizzle Cake with Poppy Seeds 🍊

SaveSave

Vegan Hot Cross Buns (Dairy free, Egg free)

With Easter fast approaching, we have officially entered hot cross bun season.  I adore these sweet, fruity, spiced buns.  How about you?  Are you a fan?

While the supermarket shelves are laden with hot cross buns this time of year, I prefer to bake my own.  That way, I get to make them dairy free, cut back on the sugar and fat content, and pack them with fruits and spice. 🙂

Hot Cross Buns (Vegan / Dairy Free / Egg Free)

Baking your own hot cross buns is not as difficult as you may think.  While it seems like a long process, it only takes around 30 minutes hands on time.  For the majority of the time the dough is resting!

As an added bonus, if you make your own, you will be rewarded with the most amazing scent of freshly baked buns with hints of fruit and cinnamon spice wafting through the house.  Believe me, it is so good!

Hot Cross Buns Collage (Vegan / Dairy Free / Egg Free)

While hot cross buns are normally made with strong bread flour, I prefer to use plain (all purpose), which gives a more tender texture.

Here’s how I make the Hot Cross Buns…

[print_this]

Hands on time: 30 minutes    Resting time: 1¾ hours
Cooking time: 20 minutes

Makes 15 medium or 12 large buns

Ingredients

Dough
250ml / 9 oz / 1 cup soya milk (or other non dairy milk)
1 tsp fast action / easy bake yeast
2 tbsp sugar
2 tbsp neutral flavoured vegetable oil, such as rapeseed (canola)
500g / 17½ oz / 3½ cups plain (all purpose) flour
1 tsp salt
4 tsp mixed spice
100g / 3½ oz / ½ packed cup sultanas or raisins
100g / 3½ oz / ½ cup Italian mixed peel
Finely grated zest of 1 organic/unwaxed orange
85ml / 3 fl oz / ¼ cup freshly squeezed orange juice (or other fruit juice)

Crosses
3 tbsp plain (all purpose) flour
2 tbsp water

Glaze
2 tbsp sugar
2 tbsp freshly squeezed orange juice (or other fruit juice)

Method

  1. Gently heat the milk until it is lukewarm.  Remove from the heat and whisk in the yeast and sugar.  After a couple of minutes the yeast will start to froth.
  2. In a large bowl, mix together the flour, salt, spices.  Stir in the sultanas, citrus peel and orange zest.  Make a well in the centre of the dry ingredients and stir in the oil, yeast milk mixture, and orange juice.  Bring together the ingredients using your hands.  The dough should be soft and sticky.  Depending on the type of flour used, you may need to add a little more liquid.
  3. Turn out the dough onto a lightly floured surface and knead for 5 minutes or so, until the dough is smooth.  Place the dough in an oiled bowl, cover with a damp tea towel or oiled cling film (plastic wrap) and leave in a warm place for an hour or so until it has doubled in size.  If your house is cool (like ours), cover with oiled foil and place in the oven at 40C / 100F for an hour.
  4. When the dough has risen, knead for a further 10 minutes then divide into 12 or 15 equal size balls.  To ensure that the buns are exactly the same size and bake evenly, I weigh the dough.  My dough tends to weigh about 1.125kg, so I tear off 75g for medium size buns.  Roll the dough into smooth balls and evenly space out on a large baking tray (28 x 40cm / 10 x 15”) lined with non stick baking paper.  Cover with the damp tea towel, oiled cling film (plastic wrap) or foil and leave in a warm place for 45 minutes or so, until they have risen.
  5. Heat the oven to 200C (190C fan) / 400F.
  6. To make the crosses, mix 3 tbsp plain (all purpose) flour with 2 tbsp water to form a thick paste.  Spoon into an icing bag with a thin nozzle (or a plastic freezer bag and snip the corner).  Slowly pipe along each row of buns, then repeat in the other direction.  Place in the oven and bake for 20 minutes on the middle shelf, until golden brown.
  7. To make the glaze, gently boil the sugar and fruit juice in a small pan for about 5 minutes until it starts to thicken into a syrup.  Brush over the buns while they’re still hot.  Allow to set before serving. These buns are most delicious served warm or toasted.
  8. The buns will last 2-3 days in an airtight container.  They also freeze well.  I tend to slice them in half before I freeze them so that they can be toasted without the need to defrost first.

[/print_this]

UPDATE EASTER 2017
It’s been three years since I posted this recipe and it’s great to hear that people are still finding it useful! I’ve loved seeing all the pics you’ve been sharing on social media, so thank you so much for tagging me! Check out these beauties, that @jameesarah shared on Instagram (you can check out Jamee’s feedback in the comments section below this post).

MORE READER REMAKES ❤️

Back in 2013 when I shared this recipe, it was really difficult to find vegan hot cross buns in UK supermarkets, so I made them myself. Here we are in 2017, and vegan-friendly hot cross buns are available in practically every UK supermarket! Times sure are changing! 🙌🏻

You might also like…

Hot Cross Bun Loaf

N.B. I’ve been a long-standing registered user of mySupermarket and would like to express my gratitude to them for sponsoring this post.